Pay-Per-Click Advertising for eCommerce Websites
Looking to quickly boost your online sales? Running pay-per-click (PPC) campaigns through Google AdWords can help you run targeted ads that cater and sell toward your specific audience, without waiting to appear in organic search results.
By the numbers:
- There are over 4 million Google Advertisers (Business Insider)
- Businesses make an average of $2 in revenue for every $1 they spend on AdWords. (Google Economic Impact)
- The top 3 paid ad spots get 41% of the clicks on the page (Neil Patel)
- AdWords competitive rate of 87% allows your advertisement to fairly promote your products or services making you a competitor to those in similar industries.
(Optimus 01)
Do we have you convinced yet? If so, read on and we will explain the three types of campaigns essential for eCommerce sites, tips and how to get started.
Search/Text Ads
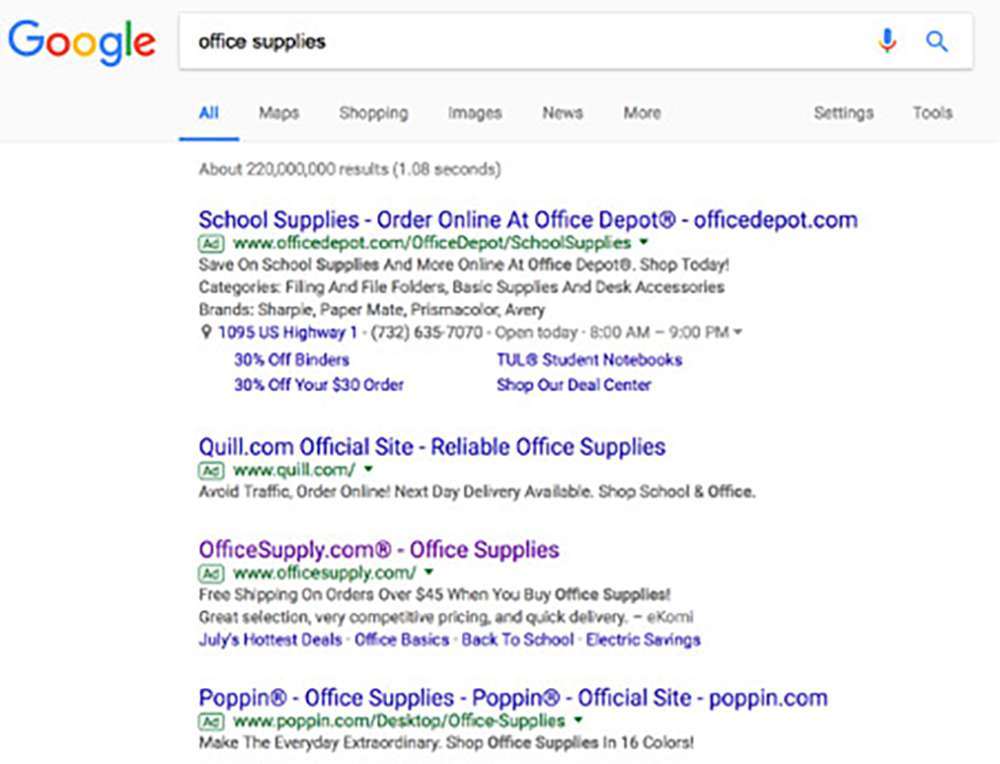
Search ads display at the top of the Google search results page when you type in a query, like in the below example.

Out of the three types of campaigns we are covering in this article, they don’t have the highest average cost-per-click (CPC). However, they can be an excellent way to capture market share and generate sales on an eCommerce site, being they are the very first listings a user will see after conducting a search.
Here is an example of the anatomy of a text ad:

When generating your search (text) ads, keep the following tips in mind:
Headline:
- Include keywords you’re bidding on or that people may have used in their search.
- Text ads consist of two headlines, up to 30 characters each. Take advantage of the space with a compelling message, offer or call to action.
Display URL:
- This display URL that shows up in green within the ad is made up of the domain from your final URL and the text in the optional ”Path” fields.
- You should use applicable keywords in the optional path fields when you can. This helps users gain a better sense of where they will be taken once
they click the ad. - The optional path text doesn’t have to match the exact language of your display URL.
Description:
- This is where you will add details about your product or service.
- Use calls to action when you can. (i.e. “shop now”, “view pricing”).
- You can enhance your add space overall by making sure to fill out all applicable ad extensions. Google will choose when to show the ad extensions but
they enhance your ad, making it stand out more. You can learn more about ad extensions here: https://support.google.com/adwords/answer/2375499.
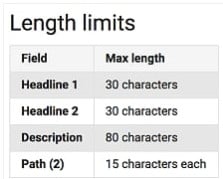
Length Limits:
You only have so many characters per line. The guidelines are as follows:

(Information courtesy of https://support.google.com/adwords/answer/1704389?hl=en)
Shopping/Product Listing Ads
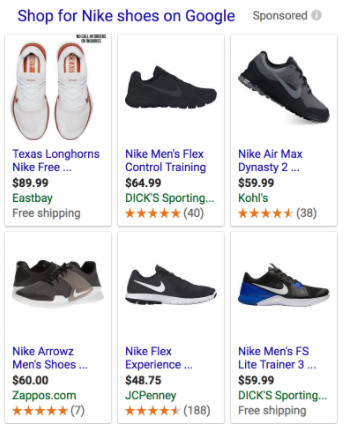
For an eCommerce site, shopping ads are crucial. They put the exact product a user is looking for right in front of them in search results, usually at the very top of the page. They appear like this within search results:

Shopping ads are extremely effective in that the user can see a picture of the item, product title, price, online retailer and typically a rating within the ads. You can also add specials or promotions such as “free shipping” to entice clicks. When clicked, the shopping ad takes the user directly to the product detail page, skipping any unnecessary category landing pages and placing that user one step closer to completing the purchase process.
To get started with shopping ads:
- Make sure your eCommerce system can export your product inventory in the required Google Shopping format. This is typically in the form of a CSV, XLS
or XML file. You will need to upload this to Google. Our 7cart eCommerce platform easily lets you do this with the click of a button. - Create a Google Merchant Center account. Within here
you will setup your storefront to be able to run shopping ads through AdWords. You will also upload your inventory file and set rules such as tax
and shipping pricing. - Login to AdWords and create your first shopping campaign. You can choose to only show products from a certain category, brand and more. You also can
set individuals bids on products or categories that might perform better for you.
Keep in mind, Shopping ads use your existing Merchant Center product data – not keywords — to decide how and where to show your ads. The product data you submit through Merchant Center contains details about the products you sell. Google will use these details when we match a user’s search to your ads, making sure to show the most relevant products. (Google)
Remarketing Ads
Remarketing (also known as retargeting) is often overlooked when creating AdWords campaigns. However, it is a crucial part of online advertising especially when it comes to pay-per-click ads.
Here’s how it works…Google has two main networks – the search network (where test ads and shopping ads run, and the Google Display Network (GDN), which is where display and remarketing ads run. Display ads can help capture the user earlier I the buying cycle, and can be targeted to many buyer demographics like age, interests and in-market searches.
However, remarketing ads work a bit differently. These ads are meant to be shown to users who have already visited your website. This is important as it, should they not have converted on their prior visit, it keeps your brand, website and even specific product they viewed in front of them by using ads that display on websites they visit within the Google Display Network.
This American Express ad on the popular website Mashable, is an example of where and how a display or
remarketing ad can run:

To get started:
- Login to AdWords and go to the shared library area (link is in he left navigation menu)
- Click into “Audiences” and follow the instructions to get the remarketing tag code. You will need to install this tag on every page of your website.
The easiest way is to place it within a header or footer file that is on every page of your site. - Google will start gather user data based on people who visit your site. They will automatically create lists such as “all visitors”, “all converters”,
etc…however, you can also create custom lists based on pages a user visits. - Once you have enough user data in your list (aim for over 1-2K users), you can create your first remarketing campaign.
- Do this by logging back into AdWords, Click +Campaign and select “Display Network only.”
- Enter an ad group name and bid. We recommend starting your bid between $0.25 and $1.00 but this will vary depending on your industry.
- Under “Choose how to target your ads”, click “Interests and remarketing”. On the remarketing lists tab, you will find the lists Google has automatically
created or the ones you have created. Select one or more to target in this ad group. - From there, you can create ads using Google’s ad builder, or upload your own. For a list of pre-determined ad sizes that can run on the GDN, click
here.
Choosing What’s Right For You
If you are just getting started with Google AdWords for your eCommerce site we recommend trying text ads first, and perhaps shopping ads. When you gather data, typically over a 30-day period, you will begin to see where users are going on your site which products or categories are working better for you and which products are converting. From there, you should be able to start successful remarketing campaigns. Just don’t forget to add the Google
remarketing Code to your website as soon as you can so your lists can start to populate.
If you have questions or comments on how our 7cart eCommerce platform integrates with Google tracking codes or how to export your product catalog to run shopping ads, please visit our help center.


